WSL: WSL2 distro failing to startup with code 4294967295
-
Your Windows build number: (Type
verat a Windows Command Prompt) 19609 -
What you’re doing and what’s happening: (Copy&paste the full set of specific command-line steps necessary to reproduce the behavior, and their output. Include screen shots if that helps demonstrate the problem.) Was browsing my Ubuntu WSL2 instance’s filesystem using the new File Explorer WSL distro integration
-
What’s wrong / what should be happening instead: Suddenly, File Explorer could no longer connect to the distro.

Then tried connecting to distro via Windows Terminal, but got:
A connection attempt failed because the connected party did not properly respond after a period of time, or established connection failed because connected host has failed to respond. [process exited with code 4294967295]

Can no longer access my Ubuntu WSL distro at all.
- For WSL launch issues, please collect detailed logs. Logs attached. wsl2-start-issue.zip
About this issue
- Original URL
- State: open
- Created 7 years ago
- Reactions: 111
- Comments: 237
Solve “process exited with code 4294967295” , run
netsh winsock resetas Administrator, then reboot your computer. The result like below:Does not resolve the issue.
I’m solved this with:
Reboot, and then:
I was seeing the same issue and managed to fix it (at least for now!)
I opened the Resource Monitor and checked the “Listening Ports” so I could see what processes were using port 53, and found dockerd.exe and svchost.exe.
As there are too many instances of svchost.exe I used the PID to find the process on Task Manager, right-clicked and selected “Go to Service” and found out that it was “SharedAccess” (ICS).
At this point I killed dockerd.exe and stopped SharedAccess service (that immediately started again) and that was enough for me to get WSL distro running again!
OS : Windows 11
I had the same issue with my wsl distro, and the work arround it was to update wsl.
in Powershell just put the following command:
and after update and shutdown restart your distro. Happy coding!!
Stopping Hyper-V service from Hyper-V manager app solved this issue.
+1 None of these solutions are working for me. My machine just updated overnight and I got the Access Denied message…
For me, killing SharedAccess service and restarting Docker did not help.
However, running
wsl --terminate Ubuntu-20.04fixed it instantly. I have no idea if any of the previous steps were prerequisites, but I believe not.After trying most of the above, what fixed it for me was setting the Command line property in Ubuntu Profile Settings to:
wsl.exe ~ -d UbuntuLike so:
Source: superuser.com
DO NOT DO THIS, everyone. This will get rid of your distro with all the data. Please don’t do this.
@PedroLamas, thanks for posting what worked for you! I don’t have Docker for Windows installed (so no dockerd.exe), but managed to work around the “process exited with code 4294967295” by simply stopping SharedAccess as you mentioned.
I can’t believe WSL team is taking so long with this issue, which clearly is happening to many users AND is preventing us from doing our work.
I had a customer’s VPN client installed on my machine (Cisco AnyConnect VPN), the customer’s installation package also installed dnscrypt. Uninstalling this has resolved the issue on my machine, confirming other threads that indicate the issue is usually related to network issues… particularly port 53.
As already quoted changing the wsl call to this:
was the solution
This actually didn’t solve the issue completely for me.
After doing the above steps, I shut down wsl and restarted it.
In powershell, shutdown wsl first:
Then, start your distro:
This helped me.
For all those that tried all solutions above and could not solve the issue. In my case it turned out that my WSL2 virtual disk was corrupted. Probably happened after executing
wsl --shutdown.After some investigation, I managed to fix it with these steps.
1. Install another Linux distro in WSL 2 mode
You must run some linux commands and since you can’t launch your current distro, you must install another one. In case you want to install the same version (for example, Ubuntu 20.04), check this: Manually download Windows Subsystem for Linux distro packages. For this example I used Ubuntu 20.04.
Remember to set that new distro to WSL 2 version. Also, remember to terminate completely your broken distro. Sometimes, even if it’s not running, the WSL process still retains the VHDX file open. I recommend to run
wsl --shutdownto ensure all distros are closed before continuing.2. Launch the new distro and install libguestfs_tools and a generic kernel.
Libguestfs is a set of tools that will allow you to mount and repair your corrupted WSL2 VHDX drive. Install it in ubuntu with this:
sudo apt-get install libguestfs-tools linux-image-generic3. Locate your corrupted WSL2 drive
Your WSL2 distro drive is usually located in the folder where your distro is installed. The file you want to find is named “ext4.vhdx”. You will need to know its full path in a linux format. In my case I had my Ubuntu distro installed in a custom folder in the D: drive so my path was
/mnt/d/wsl/ubuntu/ext4.vhdx.Make a backup of your vhdx file in another folder, just in case.
4. Repair your VHDX drive
Once you know the path of your drive, run this command to list the filesystems in your VHDX file:
sudo virt-list-filesystems /mnt/d/wsl/ubuntu/ext4.vhdxIt should give you the name for the mount, in my case it was
/dev/sda.Then you are ready to repair the drive. Run this command to start a new recovery linux VM where you’ll be able to repair your virtual drive:
sudo virt-rescue -a /mnt/d/wsl/ubuntu/ext4.vhdxThen in the new command prompt of that VM, run this command, using the name of the mount you found earlier:
e2fsck -y /dev/sdaIt should repair several things in your drive. Once it is done, run the command
exitso it will sync all changes and exit the repair VM.At this point, if all repairs went OK, your distro should be able to start again.
same problem (ubuntu-20.04, windows build 20211 x64):
After starting wsl, the following message is displayed in the console:
process exited with code 4294967295I tried the following solutions:
After restarting the computer the problem was not solved — after starting wsl the same error is shown:
process exited with code 4294967295Reboot, and then:
After starting wsl, the same error is shown:
process exited with code 4294967295Removed the Linux kernel (wsl_update_x64.msi) and reinstalled it. After starting wsl the same error is shown:
process exited with code 4294967295When rolling back to the previous version of the build (20206) — wsl works as expected.
I started getting this after the kb4571756 update. I’m on the insider beta channel, build 19042.508.
I tried all solutions listed here with no improvement. Ubuntu and Docker Desktop were both failing to start. I couldn’t convert back to wsl1 or export my distro, everything gives the same error:
Rolling back the kb4571756 update and rebooting fixed the issue.
In my case the cause was because I modified the “Starting directory” in “Windows Terminal Preview” App, because I wanted to start at $HOME… I had to revert it and that fixed the issue. You can just keep it “empty” in settings and “Use parent process directory”.
wsl(Updated: 2022/09/23)
wsl --shutdownI made it work by following : https://github.com/microsoft/WSL/issues/5092#issuecomment-645567980
then kill SharedAccess service.
And it wasn’t enough, so I opened a powershell with Admin grants and typed :
wsl -l -v wsl bash wsl -l -vthen it worked.It’s worked for me, thanks
You can solve it, just restarting linux system: Without restarting your pc These simple commands will reboot WSL2 for you which usually resolves any problems:
Press Win + R
Type: services.msc Then: Find the service LXSSMANAGER in the list. Right-click it and select Restart.
I have the same issue with the file manager, but I can still access my distro. Same build also, I did submit this to feedback hub also.
This issue is fixed with build 20226. Thanks for the effort.
ubuntu run istelf fine. ubuntu dont run from “windows terminal” // error: [process exited with code 4294967295 (0xffffffff)] fix:
open terminal terminal setting select ubuntu profile. Right hand pane hange command line executable path to folowing C:\Windows\System32\wsl.exe ~ -d Ubuntu or C:\WINDOWS\system32\wsl.exe ~ -d Ubuntu. save profile, run again.
Had the same issue when opening Windows Terminal on Ubuntu profile.
Tried terminating with
wsl --shutdownwith no luck. Thennetsh winsock resetas root and reboot, no dice. Wanted to see if it was Windows Terminal issue or WSL issue, so I launched the Ubuntu app (not through the Windows Terminal, just the microsoft store app/shell). Started, no problem. Opened a new Windows Terminal on Ubuntu profile and suddenly it worked… 🤷♂️Thanks. It worked for me on windows 11.
Here’s how to completely remove WSL2 and reinstall it with Ubuntu 24.04 (powered by Perplexity):
Remove WSL2 Completely
Step 1: Unregister All Distributions First, check what distributions are currently installed and remove them:
Repeat the unregister command for each distribution shown[1][2].
Step 2: Uninstall WSL Apps
Step 3: Disable WSL Features
Step 4: Clean Residual Files Check and delete any remaining WSL-related folders in:
C:\Users\\AppData\Local\Packages\(look for Ubuntu or WSL folders)C:\Program Files\(look for WSL-related directories)[4]Reinstall WSL2 with Ubuntu 24.04
Step 1: Enable Required Features
Step 2: Install WSL2 Open PowerShell or Command Prompt as Administrator and run:
This installs the latest version of WSL[7][8].
Step 3: Set WSL2 as Default
Step 4: Update WSL
Step 5: Install Ubuntu 24.04 Check available distributions first:
Then install Ubuntu 24.04 specifically:
Step 6: Complete Setup When prompted, create a username and password for your Ubuntu installation[3][9][10].
Verify Installation
Check that Ubuntu 24.04 is installed and running on WSL2:
You should see Ubuntu-24.04 listed with VERSION 2[8][3].
To access your Ubuntu installation, simply run:
Or launch it from the Start Menu[10].
This process ensures a clean removal of all WSL components and a fresh installation with only Ubuntu 24.04.
[1] https://superuser.com/questions/1746522/remove-wsl2-files-after-distro-uninstall-on-windows-11 [2] https://learn.microsoft.com/en-us/windows/wsl/faq [3] https://dev.to/prastha/install-ubuntu-on-wsl-2-3fei [4] https://answers.microsoft.com/en-us/windows/forum/all/i-cant-uninstall-wsl-from-windows-11/b884feff-d93f-4e3f-9012-97b87aab3576 [5] https://www.elevenforum.com/t/uninstall-windows-subsystem-for-linux-wsl-in-windows-11.10802/ [6] https://gist.github.com/4wk-/889b26043f519259ab60386ca13ba91b [7] https://documentation.ubuntu.com/wsl/stable/howto/install-ubuntu-wsl2/ [8] https://learn.microsoft.com/en-us/windows/wsl/install [9] https://www.youtube.com/watch?v=pX4SBoS_5aY [10] https://www.youtube.com/watch?v=Cn1DYQwGY8o [11] https://learn.microsoft.com/en-us/windows/wsl/install-manual [12] https://askubuntu.com/questions/1261664/how-to-uninstall-the-wsl-installation-of-ubuntu-20-04-from-windows-10 [13] https://unix.stackexchange.com/questions/781583/install-ubuntu-24-04-via-wsl-in-windows-10-from-iso-file-in-a-specific-folder [14] https://github.com/microsoft/WSL/discussions/11515 [15] https://www.reddit.com/r/bashonubuntuonwindows/comments/1e8qw5r/installing_ubuntu_with_wsl2_succeeds_then_wsl/ [16] https://www.reddit.com/r/WindowsHelp/comments/1ga3olr/how_can_i_completely_uninstall_wsl_and/ [17] https://www.youtube.com/watch?v=xftSZRA7exc [18] https://ubuntu.com/desktop/wsl
On CMD as administrator
in my case, the error message was something like “cannot find network name”. If
"startingDirectory": "\\\\wsl$\\Ubuntu-20.04\\root"(according to the official docs) then Ubuntu wsl2 will fail to start unless runningwslfirst (which @Disco-Chef did unintentionally) in Command Prompt. For now the workaround is setting"commandline": "C:\\WINDOWS\\system32\\wsl.exe ~ -d Ubuntu-20.04 "and unsetstartingDirectory(or use a directory that does not involve UNC)None of the supplied instructions worked. But the below with modifications did the trick, as the issue I found was related to my fstab entry to connect to my NFS share. So here are the steps I used to fix my WSL 2 instance.
Follow steps 1-3 listed below then modify step 4 to the below:
4. Repair your VHDX drive
Once you know the path of your drive, run this command to list the filesystems in your VHDX file:
sudo virt-list-filesystems /mnt/d/wsl/ubuntu/ext4.vhdxIt should give you the name for the mount, in my case it was
/dev/sda.Then you are ready to repair the drive. Run this command to start a new recovery linux VM where you’ll be able to repair your virtual drive:
sudo virt-rescue -a /mnt/d/wsl/ubuntu/ext4.vhdx -iThis will mount your VM’s filesystem to the recovery tool.Then in the new command prompt of that VM, run the following commands:
chroot /sysrootThis gets you into the filesystem of the VMnano /etc/fstabThen Remove the share entry in there. Save and Exit the editor
After that type
exitto exit out of the VM and sync your changes.You should be able to fire up your WSL instance and get access again.
Thank you @cgodo for providing amazing instructions to get into the recovery tool to make this change.
I’ve faced this problem too in an almost-new Windows 10 Pro install, just switched “back” from macOS. Update
KB4571756is successfully installed, and didn’t solve the issue.In the past (years ago), I used to use Acrylic DNS which is a DNS Proxy that will naturally listen on port 53 to do fancy things like serving my localhost projects on
myproject.localjust like dnsmasq does on *nix systems. Uninstalling it fixed it for me.This means that using WSL is incompatible with using any kind of DNS Server, which is something you may want to keep in mind and perhaps may need to be included in the documentation.
All Settings -> Updates & Security -> View Update History -> Uninstall UpdatesorControl Panel -> Programs and Features -> View Installed UpdatesEither takes you to the same place. You should see a list of updates and one listed with
KB4571756in the name. Right click and Uninstall it.You’ll also want to go to
All Settings -> Updates & Securityand click thePause Updates for 7 daysoption. If this issue is still around in a week and your machine resumes updates and you see a prompt to restart to install pending updates, don’t panic… You can go click thePause updatees for 7 daysbutton again and it should remove the pending install/update.Hope that helps.
@PedroLamas It worked for me too, I don’t use Docker much so I removed it. I’ll reinstall it and try again later tonight.
works for me, Thanks
In my case, the issue was caused by the disk being full where the ext4.vhdx file is stored… 🙃
not sure if it is a permanent fix for myself but I went into task manager then services and restarted the wsl service and now I can access my distro through the terminal
This works for me on Windows 10. I met this issue at morning when I have started to work (after started my PC)
This works for me. I met this issue after uninstall Docker Desktop.
I had the same issue with my WSL 2 all of a sudden it stopped working but then I did some troubleshooting this is the error I got ( The service cannot be started either because it is disabled or because it has no enabled devices associated with it Error code: Wsl/0x80070422) [ Process exited with code 4294967259 (0xffffffff)]
First, click on settings, then apps, then installed apps, then search for Ubuntu for Windows and Windows subsystem for Linux, and then on each app you click advanced settings, scroll all the way down on each app, and click repair. Then restart your computer, and it should fix the issue.
Tentei de tudo e a única solução que funcionou foi a mais simples e não estava escrita nos posts em nenhuma página que eu vi. Simplesmente resolvi atualizar wsl e pronto. wsl --updade pelo cdm como admi funciona.
I just restarted
LxxssManagerService which resolved it for me.I am using windows terminal, and was seeing this problem.
workaround: terminal settings [v] : click failing profile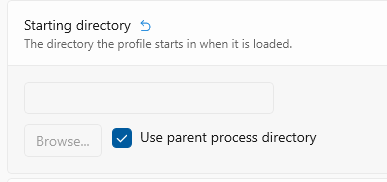 It was ~
If I put it back to ~ it fails.
With the workaround I can
cd ~just fine!! , so unsure why this started to fail…Alternate work around: powershell in win term, then
wsl -d <profile id from wsl -l>It seems the issue is with the wsl switch [-d], tested @JULIANCHO923 fix and it worked for me so I tried
C:\WINDOWS\system32\wsl.exe --distribution Ubuntu-20.04and it worked fine to o
For me, this problem only happens when I change my startingDirectory to “startingDirectory”: “\\wsl$\Ubuntu\home\username”. When I set the starting directory like this, it works fine until I reboot my system. So, the temporary workaround for now is just to keep the default starting directory as /mnt/…, and cd ~ every time I start the terminal - which is very annoying.
Quoting Disco-Chef:
This (probably) fixed it for me. WT (Windows Terminal) showed an error “Network path cannot be found” when trying to reach my Ubuntu VM in WSLv2. Reading through this thread I tried to solve it with the least drastic measures. The sequence of actions I eventually took;
Internet Connection Sharing (ICS)from services (process name “SharedAccess”)Hyper-V-Host Compute-Servicefrom servicesThis didn’t make any difference for me yet. I then
wsl --shutdownfrom elevated powershell windowThe VM opened without issues. After that, Windows Terminal also worked again. It might have been that it worked already at step 3 and that just a WSL restart was needed, didn’t test that.
I did as @Disco-Chef and it worked.
Surprisingly this one works, but when using windows terminal I’m still getting permission error
Edit, I found possible “permanent” workaround Enable “Full Control” permission for user fixes for me, this link.
@skorov I’m afraid I don’t have a more permanent solution for this, that will have to come from Microsoft themselves…
This error appears when I finish working and close the lid of my laptop at night. In the morning I get this error, but I can’t continue working without an overload in the IDE win11 24
as noted above - I had to update and shutdown WSL, but it didn’t fully get repaired until I restarted my PC. It’s back to working now.
Just in case someone is getting the same error for the same “dumb” reason like me:
My mainboard battery lost power and so my settings were lost, including the
Re-enabling the setting and WSL2 was working like a charm again. 😉
Well i fixed it… had a windows update recently… and for some reason the VIRTUALIZATION IN BIOS got reset to disabled. So in my case i just had to enable it again.
had updated bios and forgot to enable virtualization! check your bios! (amd bios is svm under frequency settings > cpu)
!!!DO NOT DO THIS !!!DO NOT DO THIS !!!DO NOT DO THIS
for me a bios update disabled cpu virtualization, reenabling fixed the error.
can confirm - fixed my issue as well. If you are still running into issues, in WSL, go to Settings => Ubuntu => ‘Command line’ - make sure the following command is input:
wsl ~ -d Ubuntufor me wsl --shutdown from PowerShell worked:
16 Apr 2020, this is the date that this issue was issued. now is 2022/3/3, this is still a issue.
I solve this problem by running the following code:
bcdedit /set hypervisorlaunchtype autoAccording to “wsl --help”, this “unsubscribes the distribution and deletes the root file system”, so everything has been lost, and at the first boot you have to set your username and password like every new distro, but at least I can use wsl again ^^
It worked for me when I used “wsl --unregister ubuntu” in admin powershell, then “wsl --install ubuntu”. I tested several solutions in this thread before so maybe it is a combination of several solutions, but in the end it worked for me. Hope this helps a little.
@JD-Gimbit You are not right in saying that WSL is not compatible with any DNS server. It can work with any DNS in the LAN or WAN. Its configuration is not sufficient to work in the modern global DNS infrastructure. Ifdistro starts like Ubuntu 20.04 or using systemd-genie as systemd system there is NetworkManager and systemd-resolved configuration that provides enough options to work with any DNS, static and dynamic using any DNS protocol, network protocol, supported/required by the DNS service(!!!). GoogleDNS is always too far and ISP’s DNS is always too limited to be reliable.
Removal of KB4571756 and pausing the updates didn’t help.
This works for me.
None of these solutions are working for me.
I made it work by uninstalling “Windows Subsystem for Linux Update” and install it again.
I get this error every time I reboot. @PedroLamas Do you if there’s a more permanent workaround until the issue gets resolved? Thanks for the investigation btw!
For me, I was getting this error when trying to launch Docker Desktop after upgrading it and rebooting.
The
netsh winsock resetcommand would work for me temporarily but fail again on the next reboot, as mentioned in other comments above. Downgrading back to my previous docker version also did not fix the problem once it started. After downgrading failed, I was ready to take the loss and delete thevhdxfile to start from scratch, so I tried renaming it todocker_data_bkp.vhdxand was immediately hit with an error the file was in use by another process calledThycotic Application Control. A closer look at this agent utility showed it had not been updated in some time. Disabling the process from startup fixed my problem instantly and we have something on the roadmap to update the utility.Hope this saves someone else some time.
Win10 Enterprise Edition 22H2
Open
Hyper-V Managerif you have, then run wsl.Work for me.
Hello guys,
Tried most of the solution above, none worked for me.
What worked for me (keep in mind that I executed most if not all the solution above, might had an effect but didn’t work until the following solution) :
1 . Go in the “Enable or disable windows feature” panel
wsl worked again.
Goddamn, I was on the verge of swapping computers. Good luck bois
I have this same issue on Windows 10. In my case, it seems to have some correlation with keeping a RDP session alive and dis/reconnecting with some time in-between. Hard to figure out anything more than that.
The one that consistently fixes it for me is the following in an admin powershell:
Get-Service vmcompute | Restart-ServiceIn my case,
wsl --shutdownseems to do nothing, andnetsh winsock resetalways works, but requires a restart which is not always to my advantage.PS: Microsoft Windows [Version 10.0.19044.2006]
I frequently encounter this error on WSL2 and none of the solutions here work reliably. I’ll do a
wsl --shutdownbut it won’t resolve the issue, then I’ll try manually launching the distro withwsl -d <Distro>and that’ll give me the connection error, and then I’ll open Windows Terminal one last time to launch it and it’ll magically boot up like nothing ever happened 😒This works for me. Note: I also have to go to Terminal – Select Setting – Select Ubuntu – Select Starting directory – Change the directory to ~ ( This will start your ubuntu in \wsl\Ubuntu\home<yourUserName> )
I stopped my OpenVPN client and wsl works. strange issue.
I managed to solve it by doing these steps.
1 step: run
netsh winsock resetas Administrator as @ZetaoYang explained.2 step: running as @truealex81 explained.
Reboot and run:
from powershell:
did the trick for me. This has worked more than once. I don’t know why this works or recall where I found this tip. No reboot required. No restart of Windows Terminal required.
I had this problem and no solution would work until I finally realized there was only a few MB of space on C drive. This was the only issue for me…
So what happened was, I was cloning a larger git repo inside WSL and all the sudden it failed. But the error messages did not say anything about disk space but rather about the file system being read-only. Hence why it took me a while to figure it out.
BTW, error code
4294967295 (0xffffffff)is in fact just-1or-EPERMfromerrno.h.i fix this, thanks
What worked for me: turn off (or just pause) NordVPN. Why? No clue. Got it from here: https://github.com/microsoft/WSL/issues/6149#issuecomment-1003240374
Complete fix: In powershell:
This is really painful for me because the solution (quick ones) just don’t work for my Ubuntu all of a sudden. So I’m writing what I did that got it working, while may not make perfect sense.
Well, I was too excited … the problem is back … but found a solution:
Moving to Linux with dev environment did the trick 😄
The problem reoccurred and on this occasion none of the above was of any help. The resolution was to do a
wsl --shutdownbefore starting the distribution again.Thanks to thesyedbasim in https://github.com/microsoft/WSL/issues/5092#issuecomment-1019197941 !
Seems that @gabbrieu’s method helped in my case. The WSL 2 did not hung up for 4 days now … so hopefully sorted … thank you !!
Facing this issue when casting the external terminal from
Visual Studio Code, my default profile is an Ubuntu distro.Working as expected in integrated terminal, my workaround is open the integrated one an
wt.exe -d .Tested all of the provided answers.
I fixed this issue by @adrianescutia’s suggestion.
@onomatopellan Setting
hypervisorlaunchtype autosolved the problem. Unfortunately, I cannot use Intel Hardware Accelerated Execution Manager (HAXM) anymore because it requires Hyper-V disabled.I first tried
But that did not work, then I followed:
And after a reboot after the second set of commands, I had to wait about 5 minutes and then my WSL2 distro was back in working order. If it was only the DISM commands or them together with the netsh winsock reset that made it work I will never know. But at least it works again.
I had this issue after I switched CPU and MB. I solved it by enabling CPU virtualization in BIOS
None of these suggestions worked for me. This issue happened after I ran diskpart compact successfully without any errors or warnings. After that I’ve tried everything so far including wsl --terminate, restarting ICS services, killing svchost, DISM and netsh winsock reset 😦 I run Debian, but going to install Ubuntu and see if I can mount the vdisk, maybe repair or at least hopefully save some files.
I erased the file
%USERPROFILE%\.wslconfigand solve the problem.That worked for me!
@pedrolamas Thanks. I did not have dockerd but I had this issue because of svchost->ShardAccess. Stopped it as you said and it worked 🎉
I have Private Internet Access set to startup automatically and that was the culprit. Disconnected from PIA and then I restarted Windows Terminal into WSL and voila I’m back in business.
Just to add a data point for whoever is investigating this. I have WSL2 on Windows 10 20H2 Build 19042.746. I have Technitium DNS server installed on the same machine. Whenever I launch a Ubuntu WSL2 distribution with Technitium DNS server running, I get the error
process exited with code 4294967295.If I kill Technitium DNS and launch Ubuntu WSL2 everything works smoothly. I created an Issue on Technitium Github repo.
I don’t have KB4571756 and i have this problem.
I’m having this issue in a variety of situations.
1.) I’m just working and I close the terminal or ubuntu. Then I’m locked out of it 2.) I have my computer running for more than 36 hours then it does this? It could be coincidental however it is unlikely. Please not I’m not checking directly at 36 hours. It’s just an estimate
Nothing fixes it. None of the above stuff mentioned has fixed it, neither have any other forum pages.
The only solution for me is to leave my PC running and every few hours to come back and check to see if it’s fixed or still broken.